
How to perform a blanket scan of w-space: Odyssey edition
29th June 2013 – 3.31 pmScanning changed in EVE Online: Odyssey, and not just the mechanics of moving probes around. The discovery scanner now shows every capsuleer entering a system every anomaly and signature whether they want to see them or not, as well as around which celestial object the signature can be found. I am hopeful that this remarkably short-sighted feature will be reverted, at least partially, perhaps only for w-space, so that the unknown remains unknown until actually and actively looked for. Until then, the blanket scanning technique is at least still applicable for locating ships in a system.
The aim of my kind of blanket scan of a w-space system is not to see what signatures are in the system, so that you can pick likely wormholes from the noise. The aim is not to see what sites and signatures there are, so that you can see if it's worth making ISK from Sleepers. The aim isn't even to see what sites, signatures, and ships there are in the system.
The aim of a blanket scan of a w-space system is to see what sites, signatures, and ships there are in the system covertly. It is important to stress the point that neither you nor your probes should be visible to any potential targets or threats. This is w-space. You don't want to be seen if you can help it.
Because we want to see ships, we do not use core scanning probes, because these will not detect ships or structures. We need an expanded probe launcher loaded with combat scanning probes.
To stay hidden, we need to bear in mind an important point: the directional scanner (d-scan) has a range of a little over 14 AU. We need to keep our ship and probes at least that far from any potential pilots in order to remain unnoticed. For our ship, we keep out of range of d-scan simply enough. We can pick a point in the system that is out of range of any ships before dropping our cloak to launch probes. We can check this easily by updating d-scan before decloaking. To keep our probes hidden, we need to be more careful, which is where this guide comes in.
A larger version of each image is linked behind the standard images in this post.
- Find a spot in the system out of d-scan range of other ships and towers.
- Launch probes.
- Move probes closer together.
- Move probes above the ecliptic plane.
- Expand the range of the probes.
It is most important to be out of d-scan range of other piloted ships, as we have to assume that they will be pinging d-scan regularly. It is useful to be out of range of towers, even if there are currently no ships present, because many pilots come on-line in their tower, and if our timing is unlucky we'll be spotted at just the wrong moment.
If we cannot get out of range of both other ships and an empty tower, compromise by launching probes in range of the tower and out of range of active pilots.
If there are active pilots as well as piloted ships in a tower, it is still best to compromise by launching probes in range of the tower. Active pilots outside of a tower are more likely to be pinging d-scan than those sitting safely inside a force field.
If the system is too small to let you get out of d-scan range of active pilots, be quick with the process and hope for the best.

A full complement of probes now gets spewed from your launcher in one shot. This saves some time in launching the probes, only to waste it by forcing a ten-second reload. Of course, this reload can be cancelled by cloaking immediately after launch, if the system is particularly busy, to reload later.
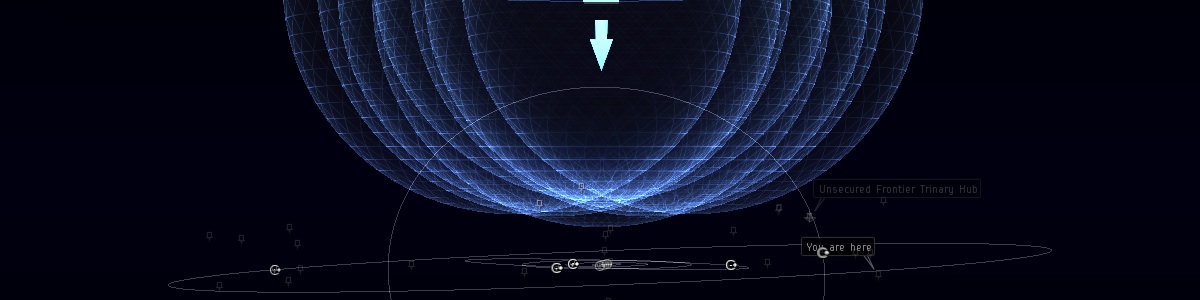
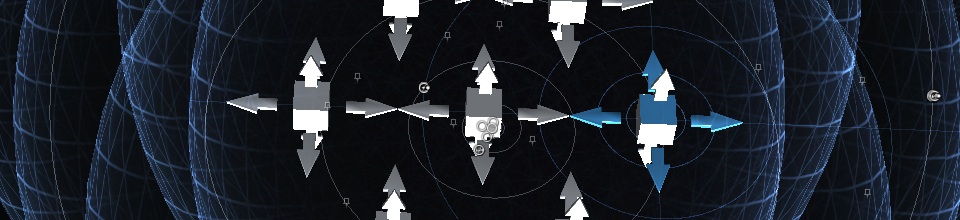
Note that the probes are in fact launched around your ship. You may think otherwise when opening the system map to start scanning:

For some reason, rather than centre the probe formation on your ship's position, where the probes really are launched and are sitting, trust me and the picture above, the probes' virtual positions are all over the bloody place. This feels unintuitive to me, and if not careful a quick punch of the scan button can spread your probes over the whole system, visible to d-scan everywhere, thus giving away your presence. We correct this in a subsequent step.
Launching the full complement of probes also currently gives you no choice about how many probes you want to play with. You get eight, like it or not. Personally, I don't like it. The seven that were initially used was better, because the 'spread' formation was 'flat', meaning that all of the probes sat on the same horizontal plane. That was good. The many capsuleer complaints that added the eighth probe back meant the spread formation needed to accommodate another probe somehow, which was accomplished by having two central probes, both offset from the horizontal plane. This is bad. Let me explain.

The idea of blanketing the system whilst keeping probes out of d-scan range is to allow for covert surveillance of ship activity. You can see them, but they can't see you. To achieve this, the probes are first moved above the ecliptic plane so that they are out of d-scan range of all celestial objects and, ideally, all sites.
A reliable method of getting the probes out of d-scan range quickly is to have the probe ranges set to 16 AU and move the probes upwards until the probe spheres are a little above the ecliptic plane.

The probes should also be moved so that they are directly above your ship's position. If they remain spread around the system, despite them ending up out of range of any active ships they may warp through one ship's d-scan range and give the game away. Moving them upwards then horizontally ensures your probes are never seen.

Once your probes are out of d-scan range, expand the range of the probes to get maximum coverage.
Oops! Because changing the range of probes now moves their positions relative to each other, that lower-offset central probe gets moved downwards, and potentially within d-scan range of a target. This negates any benefit of the blanket scanning technique.

There are options for this thoughtlessly positioned probe. For example, you can individually adjust its position once all probes are at their maximum range, holding shift to reveal its virtual box and moving it to be on the same plane as the satellite probes. Personally, I prefer to recall the probe. I feel it's simpler that way.
Let's start again, and get rid of that wayward probe.
- Launch probes.
- Recall the unwanted probe.
- Adjust the separation of the probes.
- Move the probes above the ecliptic plane.
- Scan.
- Adjust the range of the probes to their maximum value.
- Perform a blanket scan of the system.
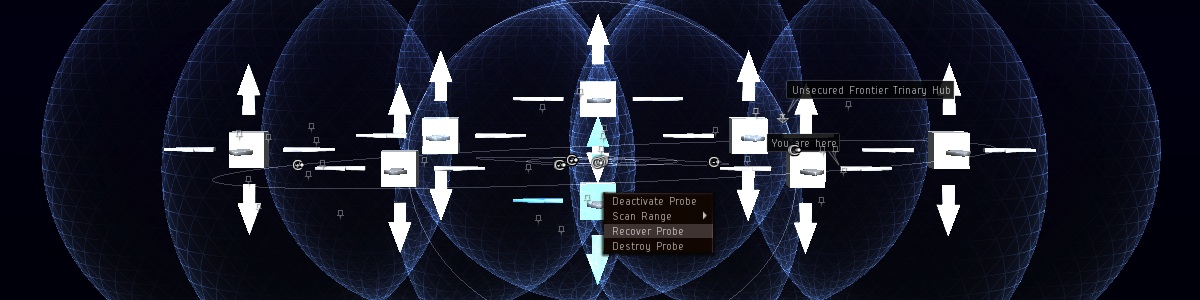
Hold shift to reveal the positions of the individual probes, and right-click on the box of the probe to be recalled. Select the 'recover probe' option to remove it from the cluster and return the probe to your ship's cargo.
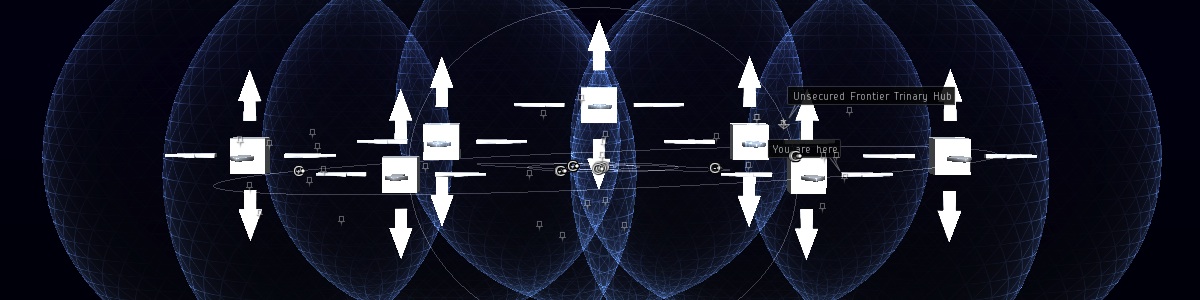
The probe has been recovered but the pattern is still not flat, which irks me. Adjust the other thoughtlessly offset central probe to flatten the spread.
Hold shift to reveal the positions of the individual probes, and use shift-drag to move the central probe downwards to flatten the formation. It's best to shift-drag the probe by the arrow, so that the probe can only be moved in the vertical axis.
Of course, I just said that recalling the probe is simpler than moving it, but there are benefits to having that central probe that become apparent when resolving signatures.
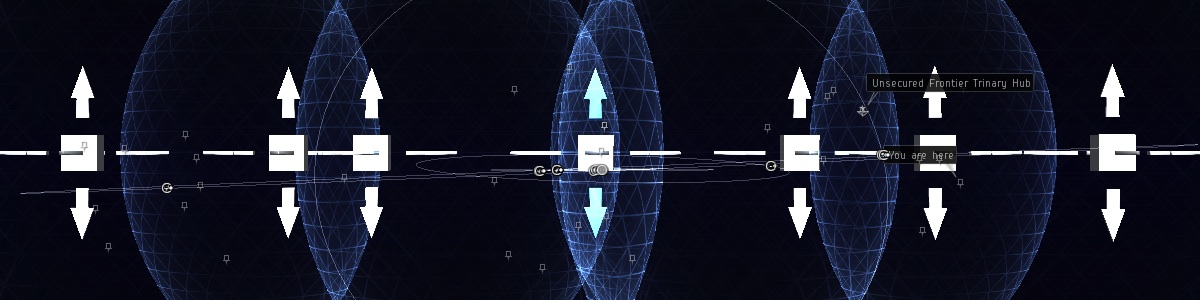
With the spread formation now looking like an actual spread formation, the separation of the probes can be adjusted properly. I find I get best results with the satellite probe boxes brought to be a little within the half-range line of the central probe.
Press alt to highlight the satellite probe boxes, and alt-drag one of them towards the centre of the probe cluster to get the required probe separation.

Grab the virtual probe box and glide the cluster up and out of the system. As explained above, the probes need to be moved above the ecliptic plane. The base range of the probes on the first launch after coming on-line is 16 AU, so no range adjustment is needed for this step.
Don't forget to move the probes so that they are roughly above your ship position too, so that the probes warp directly upwards.
With the probes up and out of the system, scan. You can push and pull the virtual boxes and spheres as much as you like without the probes going anyway. Hitting the scan button actually moves the probes. You won't get any usable results from this scan, but it keeps your probes hidden.

With the probes out of the system, as gauged by their 16 AU range, they can now be expanded to their full 64 AU range to get maximum coverage. Grab any of the spheres, wildly drag it in one direction until it can't get any bigger, and release.
If a system is too big to be covered by the probe cluster, even at maximum range, you can consider splitting up your probes to cover distant planets, or you can perform multiple scans. Note that the probe cluster can be reset at any time by hitting the 'spread formation' button in the scanning interface, so moving individual probes is easy to recover from.
If the system is small, don't feel the urge to compress the separation or range of the probes. Pushing our probes closer together can get shadow signatures, confusing the results, as can reducing the range. We actually get best results using maximum range and a standard separation.
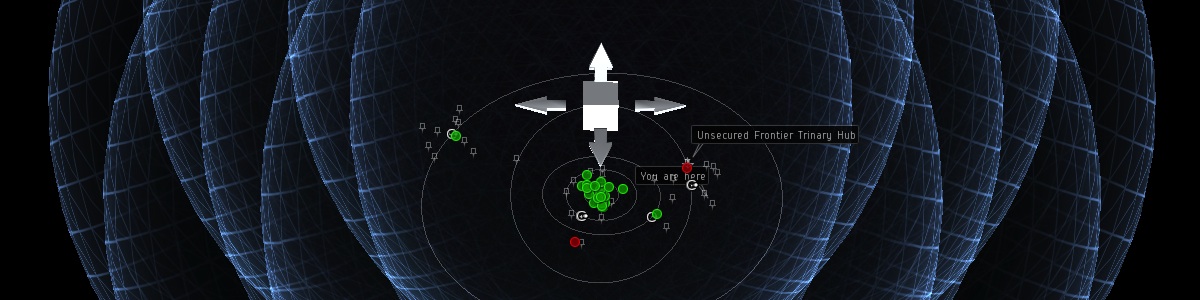
Move the probes so that they cover the whole system, where possible, and hit scan to get the results.
With no ships around, the results aren't much better than the Fisher-Price discovery scanner. But at least you know there aren't any ships around, and now you can also gauge the relative strength of the signatures to get an idea of what you're looking at, all without you or your probes being seen.
If there are ships, see if they are clustered or spread out. This can be difficult, based on the size of the ship, as the rough nature of the scan will have ambiguity in the results. But the noise from multiple ships will often cancel out to give an approximate position for all of them. This can let you know if the ships are likely to be in a tower, multiple towers—and roughly where those towers can be found—or outside of a tower and potentially vulnerable.
Once complete, our probes can remain in the blanket scanning configuration until needed for more focussed scanning or we leave the system. Subsequent blanket scans can be useful for determining changes, or movement, particularly in systems where d-scan doesn't cover the whole system.
Alternatively, if there are ships vulnerable in space, and they are not in a basic anomaly, our probes are launched, hidden, and available. We have already completed the initial steps of how to hunt in w-space using d-scan.
4 Responses to “How to perform a blanket scan of w-space: Odyssey edition”
So, all-in-all, the Great Magic Probe Nerf, IE Making the Art of the Probening available to noobs of all stripes... actually made probing (uselessly) slightly more complicated for vets...
And removed 'exploring' for sigs & amoms, turning that into Huge Roadside Billboards shouting, "Cool Hidden Stuff HERE -->" ...
Ahhh... I see CCP's master stroke of logic now... or was it just a stroke? =\
I suppose it depends on your point of view. Having to recall a probe and move one downwards isn't as convenient as having the cluster launch in a usable configuration, but it is still simpler than launching a bunch of probes individually and having to manually move them all in to position.
It's unfortunate in a way that CCP's intention of simplifying the process still requires some fiddly manipulation. On the other hand, that these manipulations are required for some subtle techniques, such as keeping all probes hidden from d-scan, means that there will still be some differentiation between new and experienced scanners.
I can also see the reasoning behind the introduction of the discovery scanner, even if I don't agree with it. I think CCP wanted scanning and exploration to be an obvious route for new players, but couldn't see how capsuleers could stumble in to it. Clearly showing all of the 'hidden' sites in a system is to pique the interest of capsuleers in to finding out how to uncover them properly.
I don't agree with this approach because the discovery scanner is a ham-fisted approach that doesn't mesh with their usual philosophy. CCP apparently didn't take in to account several factors, such as pilots who know about and are uninterested in scanning being presented with useless information on every jump, which for haulers and roamers is frequent and irritating.
This is not to mention that the very idea of exploring is undermined with the discovery scanner, because there is never any need to launch probes to see if there are any signatures in the system. Add to that how new signatures automatically appear in the scanning interface, and on the HUD in space, and the notion of w-space being unexplored and unknown is completely ruined.
Simply travelling through w-space now shows you what having to launch probes used to. A wormhole opening is immediately obvious to any pilot paying attention, without even needing to update d-scan to check for a cloaked ship entering the system.
The discovery scanner is a nice idea, but only works for brand new capsuleers who don't know about exploration. After the first couple of weeks, the discovery scanner becomes either too powerful or too annoying. Given that all CCP had to do was create a newbie mission that gave you a scanning frigate, launcher, and probes and got you to resolve a mission signature, much as they do to introduce combat, mining, and missions in general, the discover scanner is a bizarre choice.
Perhaps the discovery scanner was conceived as a neat technology demonstration and CCP was too blinded by its graphical coolness to see what a bad game mechanic it is. If there is ever a feature that needs to be rolled-back, I think this is it. The game is vastly simplified because of the discovery scanner, when the intention was merely to reveal the exploration option to those unaware of it. There are better ways to accomplish the goal.
The discovery scanner basically gave everyone instant DSP probing ability without launching probes. If you didn't have the habit checking local sig when you are farming, it would be a gift. But if you do sig checking before, there's no big difference. It's hard to tell if it's easier to gank miner in wh, since ore site becomes anomaly. Ladar site, more gank proof unless ganker becomes more patient. PS: trust me, even those K-space dudes can see wh sig, they are still afraid of local-less wh XD
The difference is in needing to uncloak, launch a probe, and reload your launcher, as well as the ship requirements in being able to fit a suitable probe launcher. Merely jumping in to a system now gives you this information, even before you have to shed your session-change cloak. Maybe this isn't a big deal in k-space, but it's a huge difference in w-space.
And, yes, there may be more tourists to unwittingly catch, but I'd rather my encounters not be limited to inexperienced capsuleers in scanning frigates. I'll just note that I've yet to catch a single Noctis since Odyssey launched, and only surprised one inattentive pilot through a newly opened wormhole. The discovery scanner needs to be killed.